What Is a Dieline in Printing and Packaging?
Date: January, 2018 | Category: Proofreading | Author: Mike Malz
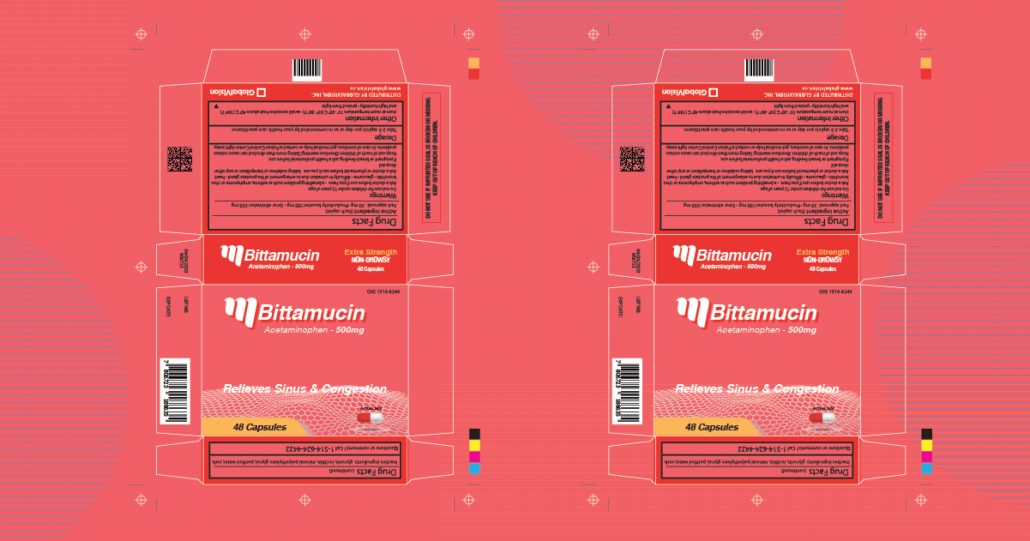
In the packaging and printing industry, the term “dieline” refers to a template needed to ensure the correct layout of a final physical package. This template serves as a diagram that marks all the folds and cut lines of a package in a flattened form.
Dielines can be created by graphic designers, die cutters, or a printer and are used in the production of many types of packages, such as pocket folders, envelopes, boxes, and more.
They consist of three types of lines: the perforation line, the cut line, and the fold line. When your design finally goes to the printer, the dielines indicate where the machine makes the cut and perforation so that the package is ready for folding. Usually, as these are two different pieces of information, the perforation lines and the cutting or trim lines should be located on different layers and as dots of color.
In the end, the printer performs the cutting and perforation processes in two different stages.
Why Dielines Matter
Given that they provide the main template for the artwork, dielines play a vital role in the die-cutting process. Think of it as a blueprint that ensures all physical elements of the final printed product, including:
- Package sizing, scale, and dimensions.
- The location of all the visual elements, like logos, text, and images.
- Placement of creases, cutlines, glue tabs, eye marks, folds, and other connection points.
- Unique manufacturing notes and bleed requirements.
Once these elements are drawn, designers get a comprehensive view of how the final product will look like. As a simple exercise, just go to your kitchen and grab a box of cereal or crackers. Unfold all the tabs and flatten the box. You’ll be able to easily see where all the creases, folds, and other visual elements coordinate with each other on the box’s sides, front and back. These are dielines you could probably run a pencil on.
However, dielines are not used solely in boxes or square packages. They’re also frequently used in the creation of a wide set of products, like beverage packages, brochures, food packages, or essentially any product requiring custom packaging.
How to Make a Dieline
The process of creating your first set of dielines from scratch might seem like a challenge, but it gets easier with time and practice. You can begin by just finding a box that resembles the one you’re designing. Again, unfold the tabs, flatten them, and measure them. These measurements will be the basis for the creation of your own dielines.
Some clients might even send an example of how they’d like the final product to look to the printing company. In this case, you can just take that model and see where the graphics and tucks are. You can also use wrapped paper to make the proper measurements of the product and estimate the needed size.
The next step is to choose your design tool. Dielines are typically created using Adobe Illustrator, Adobe Design, or Artioscad. However, no one tool is better than the other, and you can just pick whichever one you feel most comfortable using. Many times, the client will have a tool preference.
Requirements for Creating Dielines
- Computers require mathematically described lines; Therefore, dielines must be created as vector art.
- Specifications are crucial when building a dieline. Ideally, you would use Artioscad or Adobe Illustrator first to know the exact size prior to placing the file in an InDesign document. This will eventually save you money and time.
- This is not entirely necessary, but inexperienced designers might also want to make a hard copy of the dieline before sending the design to print. This stage can help you catch any unforeseen errors before production.
Finally, remember your dieline is a collaborative effort between you, your design team, and any other coworkers who may be helping you out, so always make sure to keep your creative team involved early on in the creation process. More sets of eyes mean fewer chances of mistakes happening. Nothing is worse than spending days or even weeks on a project only to be told your material is inadequate and you must start over from scratch.
| Join us for a live demo We’ll answer your questions on optimizing your quality control process through software and automation, and anything else you’d like to know. It’s 100% free! |


